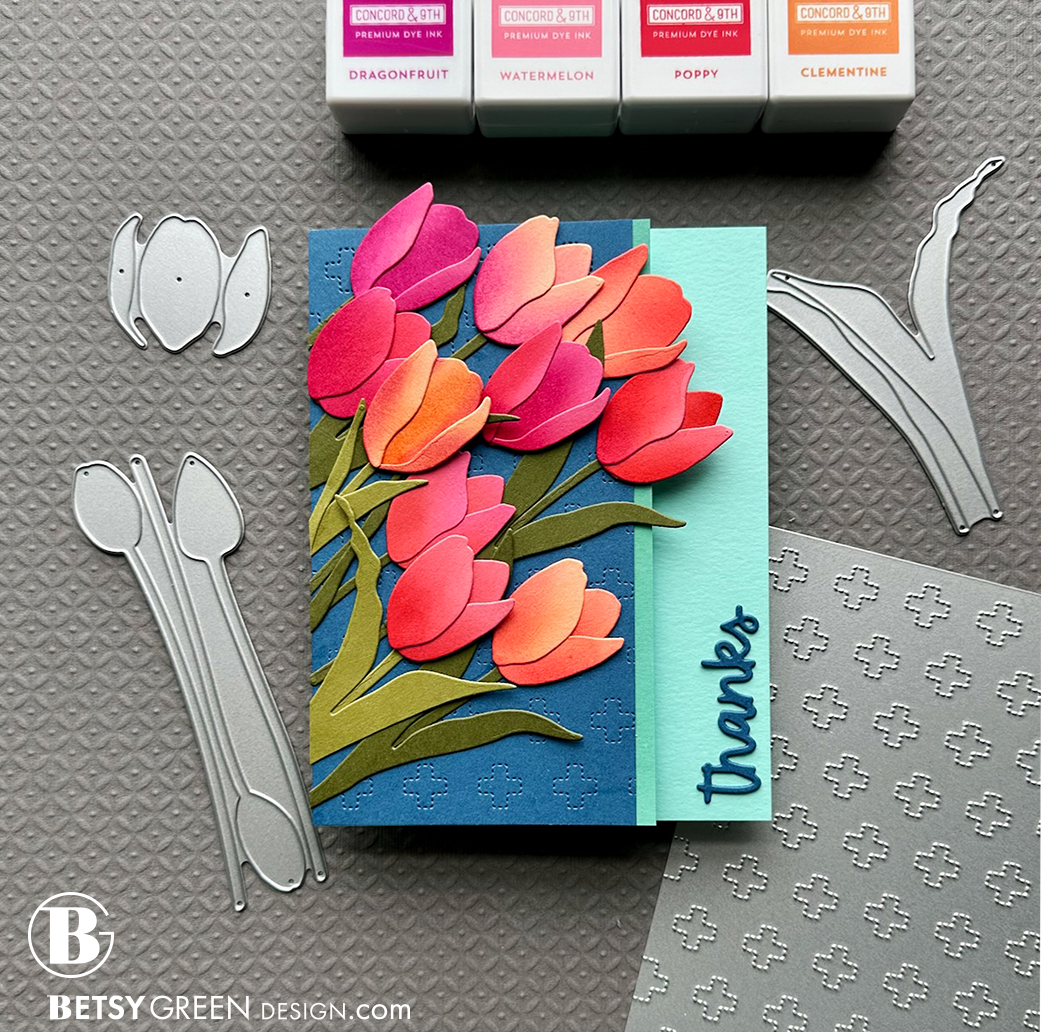
Leaning In to a Dynamic Arrangement
Tulips are one of my favorite flowers. Concord & 9th came out with a tulip set this spring. The tulips in my garden are done blooming, but I finally made time to put my new dies to use. (Now I can enjoy tulips all year, in one form or another.)
I’ve seen many cards with these tulips since the release, and they’ve all been beautiful, but (as usual) but I wanted to try to do something a little bit different. I wasn’t sure how I wanted to arrange them, but I knew I wanted them in a range of pinks, reds, and oranges, so I started there.
To create a rich color in the tulips, I started with colored cardstock for the petals. I die cut the three tulip groups in a mix of Watermelon, Honeysuckle, and Clementine cardstock colors. Using blending brushes, I added inks to give the petals some depth and to bring in some of the color I see in some of my favorite tulips. I wanted to do the blending after I cut the petals, so I could control where the colors shifted, so I placed them all on a grip mat while I did the blending. I’ve found this is a great way to keep the pieces in place, and the grip mat wipes off easily to clean it when I’m done. Once they were blended, I glued them together so they’d be ready when I decided how I wanted to arrange them.
Next, I cut the stems and leaves from a couple of shades of complementary greens.
I chose Blueberry cardstock for the background of the card front. The flowers and leaves and mix of colors add a lot of interest, but I didn’t want them on a completely plain panel, so I used a cover die that just pierces a pattern in, so the color is consistent, but there’s a bit of texture and pattern. The die I chose offered a clean geometric contrast to the flowing organic shapes of the tulips.
By cutting 1.25” off the right side of the front panel before I added the blooms, it created space for them to hang over (or lean into) that edge, and allows the color of the inside of the card to show through.
After some experimenting with my tulip blooms, I decided that I’d keep the tulips in a natural type of arrangement, but I’d do it on an angle. It reminds me of the way the flowers lean toward the sun, or sway in the wind, but it also adds a dynamic quality to the layout of the card. All the tulips and leaves are glued down, but I left some of the blooms and leaves without glue to create some natural depth. I layered thin foam squares behind the tops of a few of the blooms and used glue at the base of the bloom to help them stand out just a bit, but at a natural angle.
I chose a lighter blue for the inside & back of the card, and intentionally cut it so that a small amount of of the front panel of the card base shows behind the front panel of tulips. I blended some blues and greens along that front edge so the front part of the card base has a slightly deeper color than the back/inside. (I just used the ‘dirty’ blending brushes from recent blues & greens and layered those until I got a color I wanted. (Similar to Tidepool, but I didn’t have to glue anything on, so the dimension between the front blue and this layer remains.)
A simple die cut in the same Blueberry color as the card front finishes the one off. I was originally going to place it on the front panel, but that wasn’t right visually, so I let the flow of the flowers lead the way to the inside. I tucked the “thanks” sideways into that lower right corner
Thank you for visiting! I hope you get some time to create something soon.
Links are below if you’re interested in any of the products I used.
Supply list*:
(Listed by company, with links to Simon Says Stamp)
Concord & 9th -
Tulip Festival Dies
Short and Sweet Die Set
Positively Stitched Card Front Die
cardstock: Watermelon, Honeysuckle, Clementine, Avocado, Artichoke, Aqua Sky, Blueberry
Ink: Dragonfruit, Watermelon, Poppy, Clementine, Tidepool
Gina K Designs -
Waffle Flower - Grip Mat
*Affiliate links have been used with no cost difference for you.


