Elevating A Background
Back from vacation, I finally got a chance to use the Bunch of Balloons series of products from my recent Concord & 9th order.
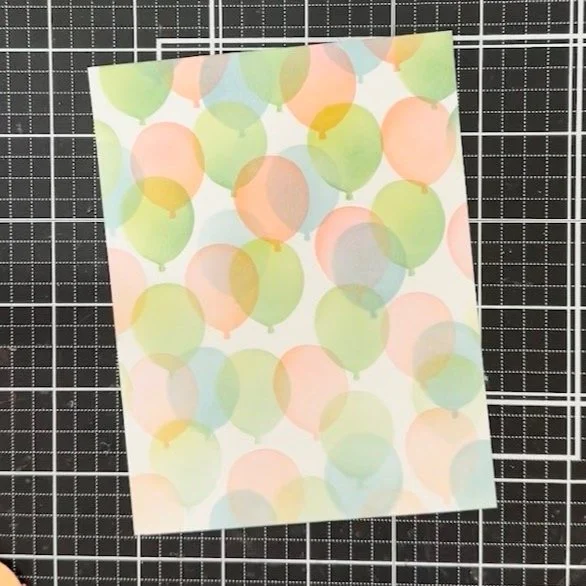
I made a bunch of balloon backgrounds with the stencils and a color palette I chose (Watermelon, Creamsicle, Sprout and Eucalyptus). One of them did not work out as well color-wise as I’d intended. I didn’t love it, but that didn’t mean it wasn’t useable. I was sure I could do something with it. It was time to regroup a bit…

After I finished the blending for this background, I realized I didn’t like it and it wasn’t what I intended. I should have used smaller brushes, or shifted the way I blended the colors. My other backgrounds I was happy with. (Those will show up on other cards soon.) A third color that could act as a bridge between these two complementary-leaning ones might be the solution, so I added in a handful of balloons in Powder. (See the second image in the pair below.) That helped, but it was still not quite what I wanted, but what about using it in a smaller amount and not the full background?

Adding some solid stripes in Blueberry to the sides of the balloon panel, and making it a shaker allowed the fun of the background to remain, but not play as major a role in the overall design.
To make this panel a shaker I reused some packaging from a stamp set I’d just gotten that was a little larger than the panel. I trimmed it down and folded it over on the back, securing with tape. Once I had three sides cleanly wrapped, I added in a mix of embellishments from Honey Bee Stamps (see them in the supply list) and sealed it up.
Next, I cut my stripe pieces (Blueberry cardstock) 2” longer than my card front so I could score them and wrap them around the top and bottom. Because they were going on top of an acetate-wrapped panel, this served dual purposes of making them more secure, and giving a cleaner edge over the not-so-flat balloon panel.

For some accent and interest on the front, I die cut some balloons out of cardstock using the coordinating dies, and did some ink blending on them for highlight and shadow. A little white gel pen gave it some final highlights. I stamped the string and bow for the balloons on. (Tip: to stamp the bow I stamped it both with the balloon in place with temporary adhesive and without it, so it would be a clean stamp.) If you watch my reel, you’ll see that I changed my mind about color on the smaller balloon. Sometimes you have to see it to know for sure what gives the effect and balance you want. You’ll also see that I decided to add in that second balloon AFTER I’d attached my greeting, and stamping wouldn’t work well to tuck under that, so I used a black pen to draw it in.
Thank you for visiting! I hope you get some time to create something soon.
Links are below if you’re interested in any of the products I used.
Supply list*:
(Listed by company, with links to Simon Says Stamp)
Concord & 9th -
Bunch of Balloons Stencil Pack
Bunch of Balloons Clear Stamp Set
Bunch of Balloons Die Set
Ink: Watermelon, Creamsicle, Sprout, Eucalyptus, Powder
cardstock: Watermelon, Eucalyptus, Blueberry, Harbor, White
Gina K Designs -
Honey Bee Stamps -
Confetti Mix - Bokeh Lights
Tiny Diamonds - Crystal AB
The Ink Stand - Rectangle Ink Stand
Tsukineko - VersaFine Onyx Black Ink Pad
Waffle Flower - Grip Mat

*Affiliate links have been used with no cost difference for you.